|
|
|
|
Sixgate Application Notes
What is a Noise Gate and Why use them?
![]()
![]()
![]()
![]()
![]()
Sixgate
Application Notes
What is a Noise Gate and
Why use them?
If we strip away all the flashing
LEDs, esoteric Key filter sets, Midi interfaces, etc. and get to the
bare bones of it all, a Noise Gate is actually just a switch. It
allows an audio signal to pass through when we want it to, and stops
or attenuates the audio signal passing through when we don't want it
to.
The secret of making the Noise Gate more than just a
simple on/off switch (not unlike that of a simple AC power switch) is
the control we can have over its operating parameters. These are:
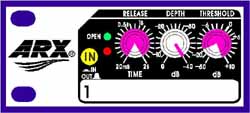
How fast it opens (Attack time)
How fast it closes (Release time)
When it is off, then how off it is (Attenuation or Depth)
When we want it to open or close (Threshold)
These are the basic operating functions of a Noise Gate. Some manufacturers offer you less, some offer you more. At ARX we decided to offer you more gates, plus the features you can use out there in the real world.
Why SIX gates?
When we designed the Sixgate we first asked audio professionals for
what applications they usually used noise gates.
The answer we got back was most commonly 'Gating Drums'. Yes, a
fairly predictable answer. Then we looked at the existing products
available to the Pro Audio Market. These were all either single,
dual, or at the most four channel units.
Then we thought, take a look at your average Drum Kit. Does it come
as a single, dual or four drum set? Not very often.. It comes as Kick
Drum, Snare, a couple of mounted Toms and at least one Floor tom. Add
to that a High Hat and what have you got? Six instruments and six
channels.
We then decided that our gates had to have enough channels to cover
just about any application in the one unit, while occupying only one
rack space. So we decided on six!
The Sixgate was born.
Circuit description and basic
functions
To interface with the rest of the Pro Audio world we've given the
Sixgate balanced inputs and outputs on Tip Ring Sleeve jack
connectors, allowing it to be easily interfaced with its most common
application - as a channel insert for mixing consoles and balanced
line level sources.
The control section of each channel is accessed via the Sidechain
Insert/Key Input jack on the rear panel.
For the technically minded, the control section of each channel of
the Sixgate consists of a variable gain input buffer, an AC/DC
converter, comparator and LED indicator Stage. The Red LED indicates
the gate is closed, the Green LED indicates the gate is open.
The variable gain buffer determines the gate's Threshold, the AC/DC
converter converts the audio signal to a DC control signal, the
comparator provides the variable gate release time control signal for
the gain control element, and the LED indicator stage provides the
visual indication of operating status.
The attack time of the Sixgate is
Program dependent. If the signal being gated is transient (sharp
attack) in nature, then the gate opens really fast; if the increase
in signal is slower, then the gate opens slightly slower, minimizing
interference with the dynamics of the signal being gated.
The audio signal control stages consist of the balanced input stage
to minimize hum and RF pickup in the input cabling. The gain control
element and variable attenuation stage then feed the balanced Output
stage. The gate In/Out switch lets the audio signal completely bypass
all electronic circuitry.
We've housed the complete unit in an all steel chassis to minimize
dreaded hum pick up from other units (not really wanting to build
something to reduce noise that introduces more of it!) with an
attractive extruded aluminium front panel. It also has its own built
in High Headroom power supply.
The power transformer has an expensive all copper shield to prevent
EMI (Electro Magnetic Interference) getting into the audio circuits.
We don't want you powering your Sixgate from a Battery Adapter
through a plug barely suitable for your transistor radio. No wall
warts here - this is a serious piece of Professional Audio Equipment,
not an FX foot pedal.
Gating Drums
As people told us, the most common application for gates is gating
drumkits and other percussion instruments. The aim here is two
fold:
In this application the Depth is
normally set at Max (-40dB) to ensure the On to Off reduction is as
great as possible. The Release time can be varied between Min, which
is useful for snare drums (to quickly chop off the decaying sound),
and Max which is useful for toms (to ensure drum decay sounds
overtones etc. are heard and then signal is gated off). The Threshold
is variable due to its dependence on the signal level being
gated.
A note of caution. Setting too high a Threshold can
chop off input transients or chop up the signal, especially on short
release times. The best way to set the threshold is to start in the
Min (-40dB) position and increase the threshold until the desired
gating effect is obtained. This way you will ensure you have the
gating effect that you want, without losing any of the drum's natural
sound.
Gating instruments
Gating instruments can be very useful for reducing hum, buzz, hiss
and other extraneous noises you'd rather not have on your keyboard,
bass or guitar channels.
For this application use a Depth setting between Max (-40dB) and half way (-20dB), and a Release fast enough so you don't get a hangover of the noises you're trying to gate out, but not so fast that the gate chops off the end of the notes. You want the gate to close as soon as the signal being gated decays away. Once again, as in all gating uses, the Threshold is dependent on the signal level.
Gating Vocals
Have you ever noticed that your vocal frontline mics make great
overheads? They pickup EVERYTHING (including conversations the band
wouldn't want the crew to know about) as you can hear if you listen
through the PFL's!
Gating vocals can be very handy in a live situation for reducing
stage sounds, cymbal spill and generally cleaning up background
vocals.
Gating the main lead vocal is not something we'd recommend for the
inexperienced engineer. However if the lead vocal mic is only 2
metres (6 feet) from the Drum Kit (as is often the case), it can be
very handy for removing cymbal spill. Use the low pass filter in the
Sidechain insert to reduce the gate's sensitivity to higher
frequencies (See the section on Sidechain Inserts) so that the gate
doesn't open every time your drummer hits the crash cymbal. This
method of operation is also very helpful for that curse of the Audio
Engineer's life - the SINGING DRUMMER.
You can also clean up backing vocals by assigning all of them to a
single subgroup, and inserting a gate on that group. Now you can have
the backing vocal faders up all the time to catch them when they DO
sing, but you won't pick up all the stage sound through those wide
open mics when they DON'T sing.
If you want to experiment, you could also get background vocals to
punch in just when you need them by triggering the backing vocal
gates with the Lead Vocal Channel through the Sidechain Insert. (See
the section on Key Inputs). This way the backing vocals come through
ONLY when the Lead Vocalist is singing. With a long release time the
backing vocal will hold on (stay open) and then decay away. Very
tasteful.
With Vocals we suggest a short to medium release time so that the
gate doesn't produce the effect of the modulated cymbal mic - i.e.
Every time the Vocal mic opens, the cymbals come up dramatically in
the mix and die away with the vocal gate release. It sounds like
waves at the seaside, but about 100dB louder!
A Depth setting of around 10dB will
ensure that the vocals don't leap out from nowhere. The Threshold
once again depends on the signal level through the mixing
console.
Gating can also reduce the possibility of feedback, by reducing the
number of microphones that are open at any one time. However, make
sure that you don't get lulled into a false sense of security, and
have your gain controls and fader levels set too high. When the gate
opens, the channel is going to be just as susceptible to feedback as
an ungated channel. If you have 3 or 4 vocal channels with high gain
all open at once, the possibilities of feedback are very high, and it
can be very embarrassing if they all decide to open at
once.
Gated Reverb Drum Sound
Apart from gating dry drums (no effects added), the next most popular
use for gates with drum kits is controlling the decay envelopes of
reverb applied as an effect to the Snare and Toms.
Although there are a lot of Digital Reverbs now available with this
type of sound as a preset, there are also a lot of older R1000 type
units still in use out there that offer minimal controls, apart from
fairly basic Room presets. You may not want to tie up an AMS on the
Snare drum!
Like most great ideas, its beauty lies in its simplicity. By patching
a gate to the output of the reverb you can now control the decay
character of both the drum and the reverb being added to it. A short
release time will chop the reverb off very quickly while a medium
release will allow the reverb sound to come through with the decay of
the drum before they are both chopped off together.
The setting here for the Release control should be whatever is required to achieve the desired effect - experiment till you get the sound that you're looking for. The Depth should be on maximum (-40dB) and the threshold as always is dependent on the signal level through the mixing console.
Sidechain Inserts and Frequency
Sensitive Gating
The Sidechain Insert/ Key Input allows you to manipulate the Audio
Signal being applied to the control circuitry of the Noise Gate. This
socket accesses the audio signal after the input stage, but before
the threshold variable gain buffer, and therefore is Audio not a DC
control voltage.
Using this socket as a Sidechain Insert loop allows you to introduce
filters or equalizers to modify the frequency sensitivity of the
control circuitry.
The simplest way of making the Sixgate frequency selective is to
insert passive Low or High Pass filters in the loop. A Low Pass
filter allows lower frequencies to flow unopposed through into the
control circuitry while reducing in level (attenuating) the higher
frequencies. This is handy for preventing cymbal splashes or the High
Hat (both basically high frequency audio sources) from falsely
opening the snare or tom channels (both basically low/mid frequency
audio sources).
Alternately we can insert a High Pass filter in the loop. A High Pass
filter allows higher frequencies to pass through unopposed while
reducing in level (attenuating) the lower frequencies. This is handy
for stopping drums or Bass Guitar amps falsely triggering cymbal or
high hat channels.
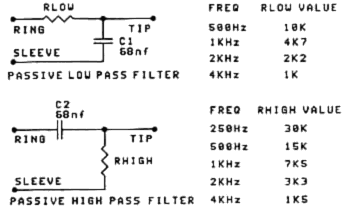
You can also insert a Graphic or Parametric Equalizer into the Sidechain insert to make the Sixgate more or less sensitive to specific frequencies. Boosting or increasing the signal level in a specific frequency band makes the Sixgate more sensitive to that frequency. Cutting or decreasing the signal level makes it less sensitive to that specific frequency band.
Remember that altering the frequency response in the Sidechain Insert loop has no effect on the frequency response of the signal being gated.
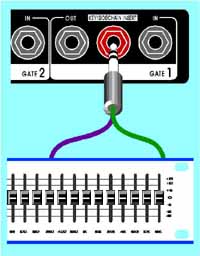
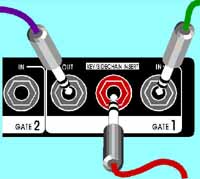
Key Inputs
When you plug a signal into the Key Input of a Sixgate channel, that
channel is no longer controlled by the signal plugged into the IN
socket, but by the signal you have plugged into the Key Input
socket.
As we mentioned above, it's handy for signal control like opening your backing vocals only when the main singer is singing. You can also have instruments like the Kick drum keying the Bass guitar channel to tie the bottom end rhythm section tightly together. Or to tighten up a ragged brass section by using the lead player to key the rest.
The Kick Drum from Hell
We've saved one of the best uses of gating until last. Have you ever
wondered how you can get a gut thumping kick drum sound from the
cardboard box that your drummer calls a kick drum? Here's the secret.
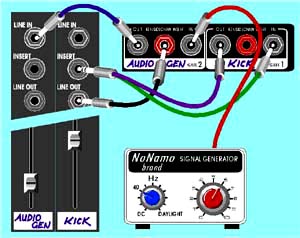
One final thing to remember - if you think the Sixgate is great on drums out front, then you should see what a difference it makes on drums in the monitors!
Well, that's just about it. We've
tried to include typical Sixgate applications for you to try, but if
you come up with a killer application, then let us know and we'll
include it next time.
Back to Application
Notes Page
To Sixgate
page
Open Sixgate
brochure as Adobe
Acrobat PDF file
![]()
![]()
Thanks for looking at the range
of ARX professional audio products. If you would like to contact us,
please click on the Email link above.
Contents © ARX Systems®